How to Add an Appointment
🎬 Video tutorial: Watch on YouTube
Appointments can be added by either the assistant (secretary) or the doctor directly. Follow the steps below based on your role.
Where to Find It
Click an address to open that screen on your own clinic. The first click asks which clinic you are, then remembers it. Addresses holding a {id} or {token} need a specific record, so they are shown but not linked.
| Screen | Address |
|---|---|
| All Appointment | /all-appointment |
| Kanban board | /all-appointment-kanban |
| Calendar | /all-appointment-calendar |
| Today's appointments | /appointment-today |
| Manual Reservation | /new-appointment |
| Book for a patient you already opened | /take-patient-to-appointment/{patient_id} |
| New Appointment — the week grid | /advance-reservation |
| Advance reservation for one patient | /advance-reservation/{patient_id} |
| Appointment details | /show-appointment/{id} |
| Edit appointment | /edit-appointment/{id} |
| Appointment settings | /appointment-settings |
| Import appointments from CSV | /import/appointments |
| The patient's own appointment page (QR link) | /qr/appointment/{token} |
Adding an Appointment as an Assistant
Step 1 — Add the Patient
Before booking an appointment, the patient must exist in the system.
- Go to the Patients section from the main menu.
- Click Add Patient and fill in the required details:
- Full name
- Gender
- Phone number
- Date of birth / Age
- Blood type
- Address
- Click Save to create the patient record.
Step 2 — Book the Appointment
- Open the patient's profile or go to the Appointments section.
- Click New Appointment.
- Select the appointment date and time.
- Click Confirm to save the booking.
The appointment will be saved and linked to the assistant who created it, so the doctor can see who made the booking.
Priority
The booking form carries a Priority for the visit: Urgent, VIP, Elderly, Normal or Follow-up. Leave it alone and the visit is Normal, which is what most of them are.
Priority is recorded on every visit whether or not it changes anything today — it only moves a patient up the line when your clinic's queue order reads it. See The Waiting Queue for what it does and how to switch it on.
One rule is worth knowing here: an Urgent visit is never treated as late, however long the patient takes to arrive.
Adding an Appointment as a Doctor
- Go to your Dashboard or the Appointments page.
- Click New Appointment.
- Select or search for the patient.
- Choose the date and time slot.
- Click Confirm.
Leaving the Form
The button beside Save goes back to wherever you opened the form from, and names it: Back to the patient when you came from a patient's record, Back to the consultation when a doctor came from a visit, Back to appointments when you came from the list — keeping whatever you had filtered there.
If it cannot tell where you came from, it returns you to the appointment list, as it always did.
The Appointment List
The same appointments, in four shapes. Pick the one that matches what you are doing:
| View | Best for |
|---|---|
| All Appointment | The full table — searching, filtering, reading payment state |
| Kanban board | Running the day: drag a card between status columns |
| Calendar | Seeing how a week or month fills up |
| Today | The reception desk view of today only |
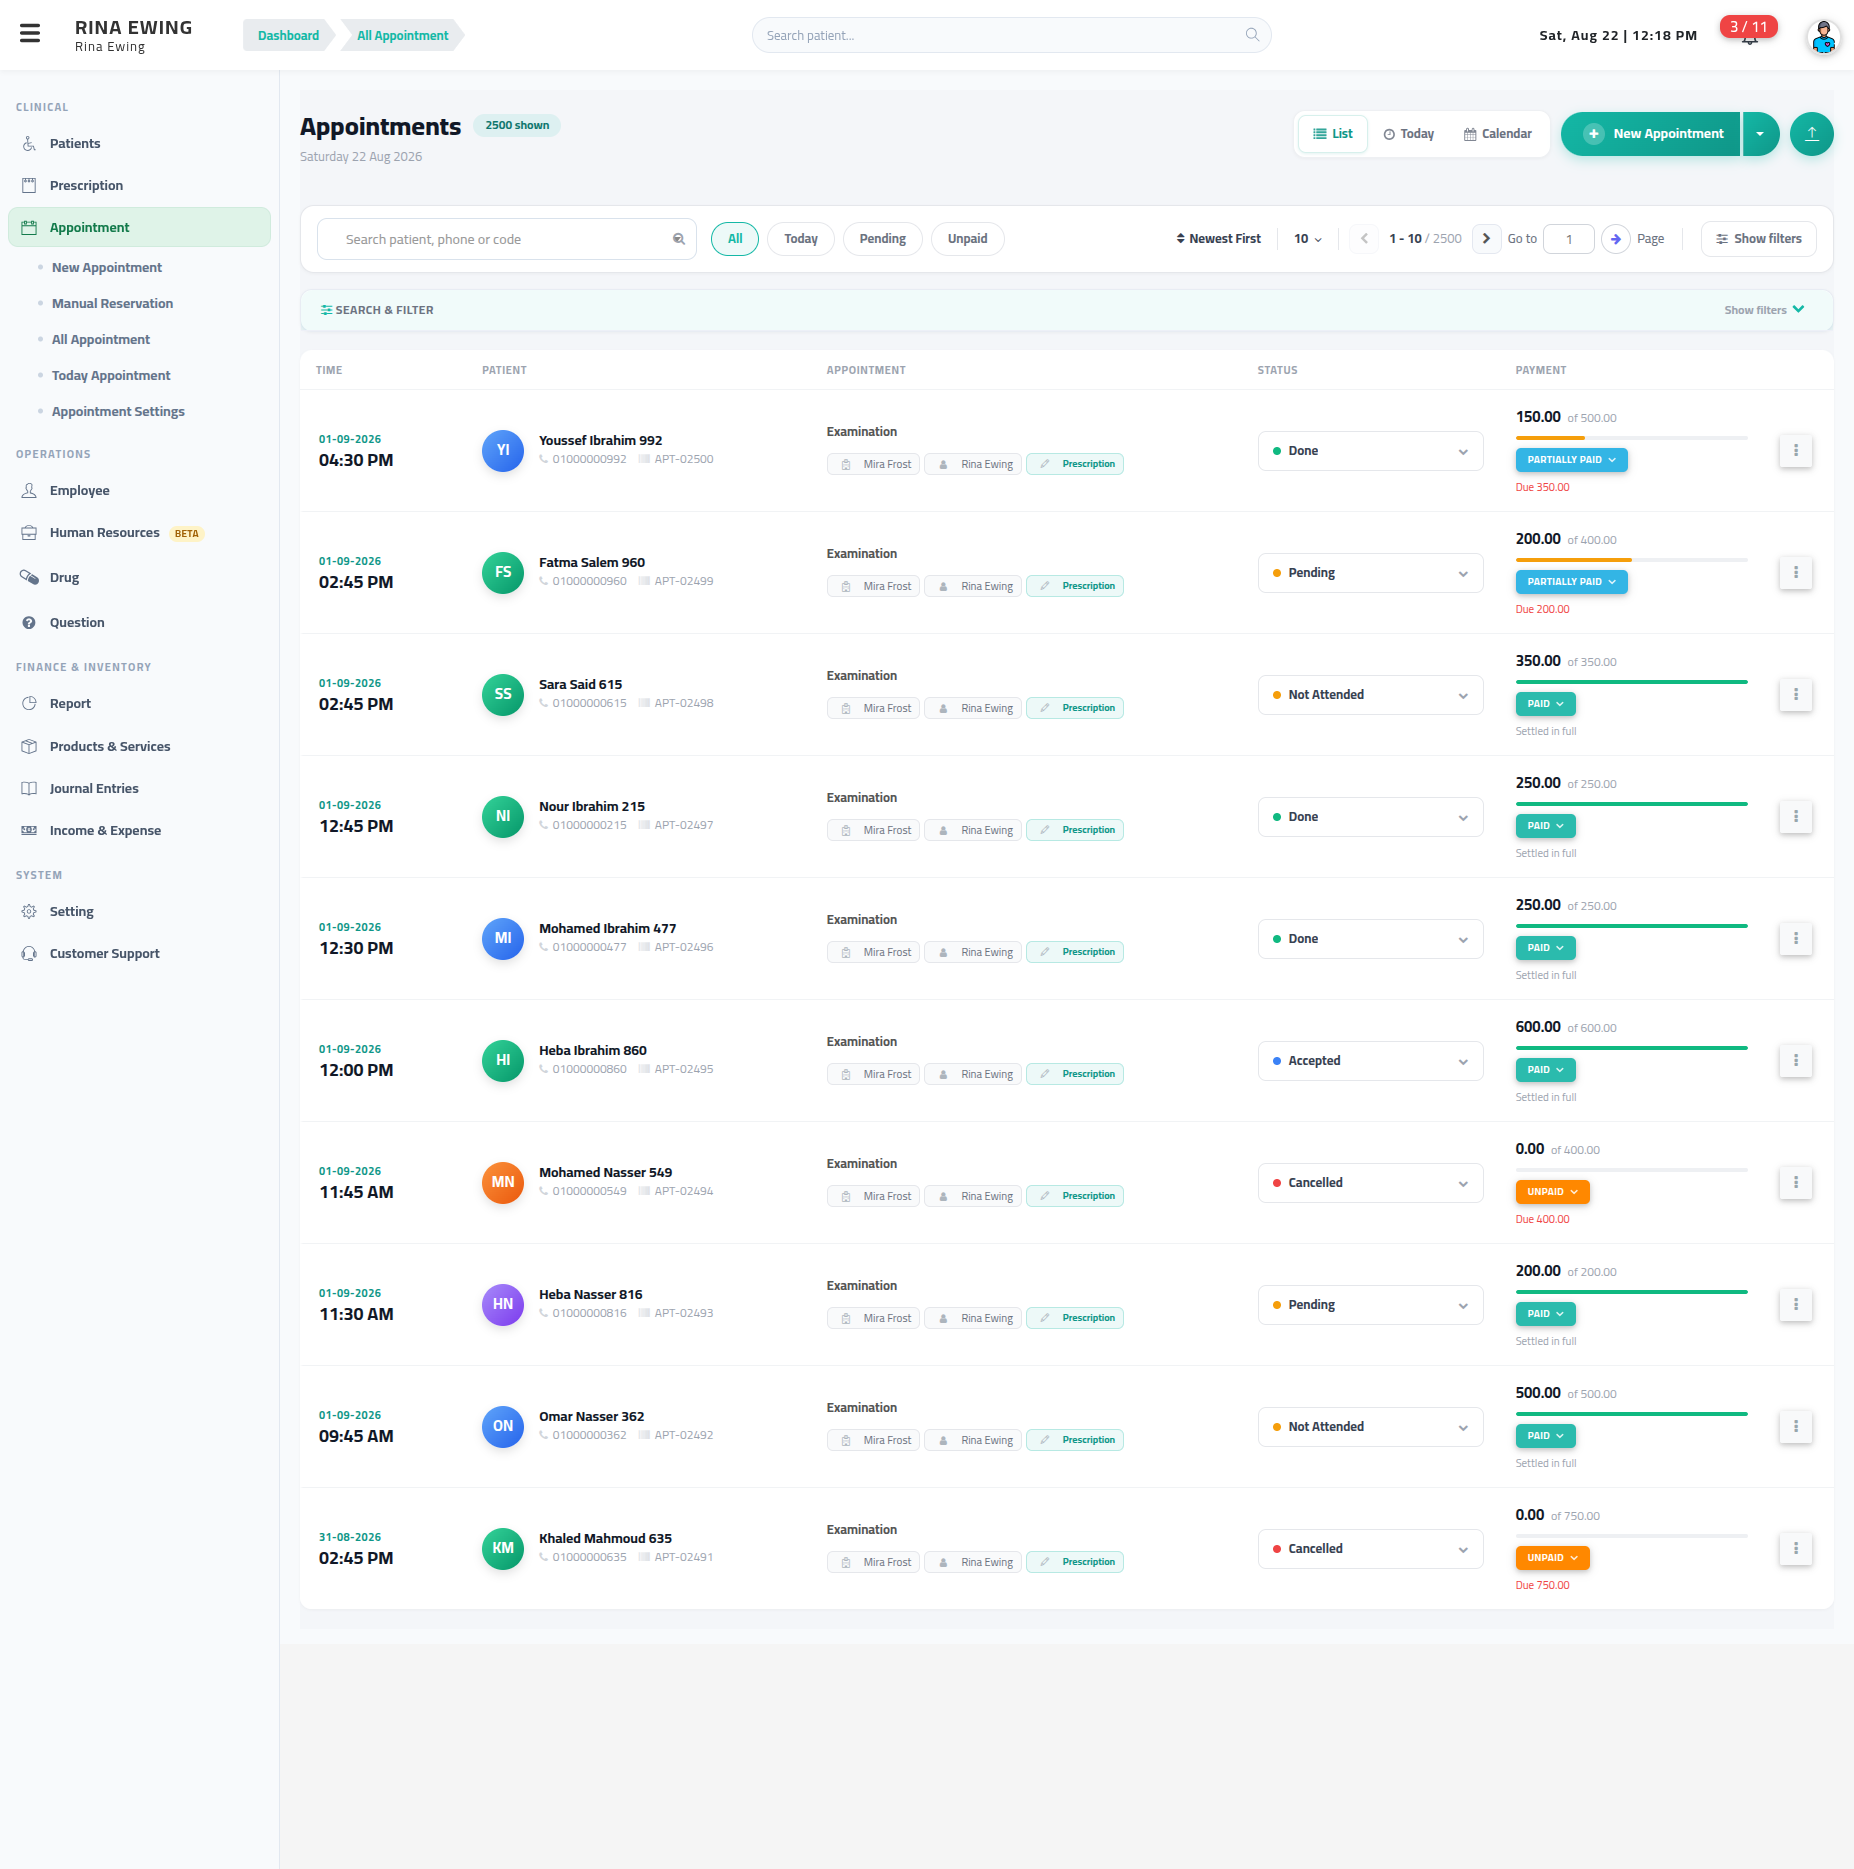
What a board card shows
A card is deliberately short, because the board is read across twenty cards at once:
| On the card | Where the rest lives |
|---|---|
| Patient name, and the priority badge when the visit is Urgent, VIP or Elderly | Phone and appointment code appear when you rest the pointer on the name |
| One line of time · room · visit type, plus the arrival time once the patient has checked in | The date joins that line only when the filter spans more than one day |
| Paid against the fee, as a bar and the amounts | Clicking the amounts changes the payment status |
| The visit status, changeable without dragging | Check in, Add Payment, edit and delete are in the card's ⋮ menu |
Narrowing it down
Four chips cover the usual questions: All, Today, Pending, Unpaid.
The search box matches patient name, phone or code. Search & Filter adds a date range, a patient, a clinic, a service and one or more statuses; a counter shows how many filters are on, and Clear all resets them. Sort by newest or oldest first.
The columns
| Column | What it shows |
|---|---|
| Time | Date and time of the visit |
| Patient | Name, phone, and a shortcut to write a prescription |
| Appointment | Visit type, the clinic, and who booked it |
| Physio sessions | Session count and what is still owed on them, where used |
| Status | The current status, changeable from the row itself |
| Payment | Paid of total, then either Due … or Settled in full |
Two banners sit above the table while the clinic is running: Current patient and Next patient.
Each row's menu holds View details, Edit and Delete.
The Appointment Page
Opening an appointment gives you the visit itself rather than a row about it.
The header carries Change status, Add Payment, Add Session, Edit, and a More menu with Delete. Four tabs follow:
| Tab | What it holds |
|---|---|
| Appointment Details | Patient, clinic, date and time, visit type, fee, notes |
| Payment Information | Every payment against this visit, and what is still due |
| Sessions | Sessions filed on this appointment, where the clinic runs physiotherapy, dentistry, beauty or dermatology |
Add Session appears whenever the clinic has switched on at least one specialty that writes sessions — physiotherapy, dentistry, beauty or dermatology. With one switched on it is a single button that opens that specialty's session form. With more than one it opens a short list: pick the specialty and its form opens, already filed against this visit.
An appointment holds one session, and a session belongs to one appointment. Once the visit has its session the button becomes View session and opens it; a second session on the same visit is refused, and the session form no longer offers that visit in its appointment list. A session a course booked ahead on this date is the visit's session — recording the visit fills it in.
The same button sits under Next steps in the Appointment booked box that follows a new booking, and behaves the same way. | Activity Log | Who changed this appointment, what changed, and when |
TIP
Take payments from here rather than from Add Payment in the ⋮ menu on a kanban card — see Taking Payments.
Appointments booked by a course of treatment
A physiotherapy (or dental, or beauty) course can book all of its dates at once — see Booking the whole course. Those appointments are ordinary appointments of type Session, with two differences:
- They show a course chip — the course's code and the session's number in it, for example
PTE-00012 · 4/10— on the list, the kanban card and the appointment page. Pressing it opens the course. - Cancelling one asks who cancelled it: the patient or the clinic. The course records the answer. An appointment that does not belong to a course is cancelled exactly as before, with no question.
They carry no fee: the money for the visit is recorded on the session when it is written.
Advance Appointment Reservation
The Advance Appointment Reservation page allows you to pre-book a patient into a specific time slot on a future date without going through the standard appointment flow.
Step 1 — Open the Advance Reservation Page
Navigate to Appointment → New Appointment in the sidebar. The page shows a whole week of time slots for one clinic, with the booking form beside it.
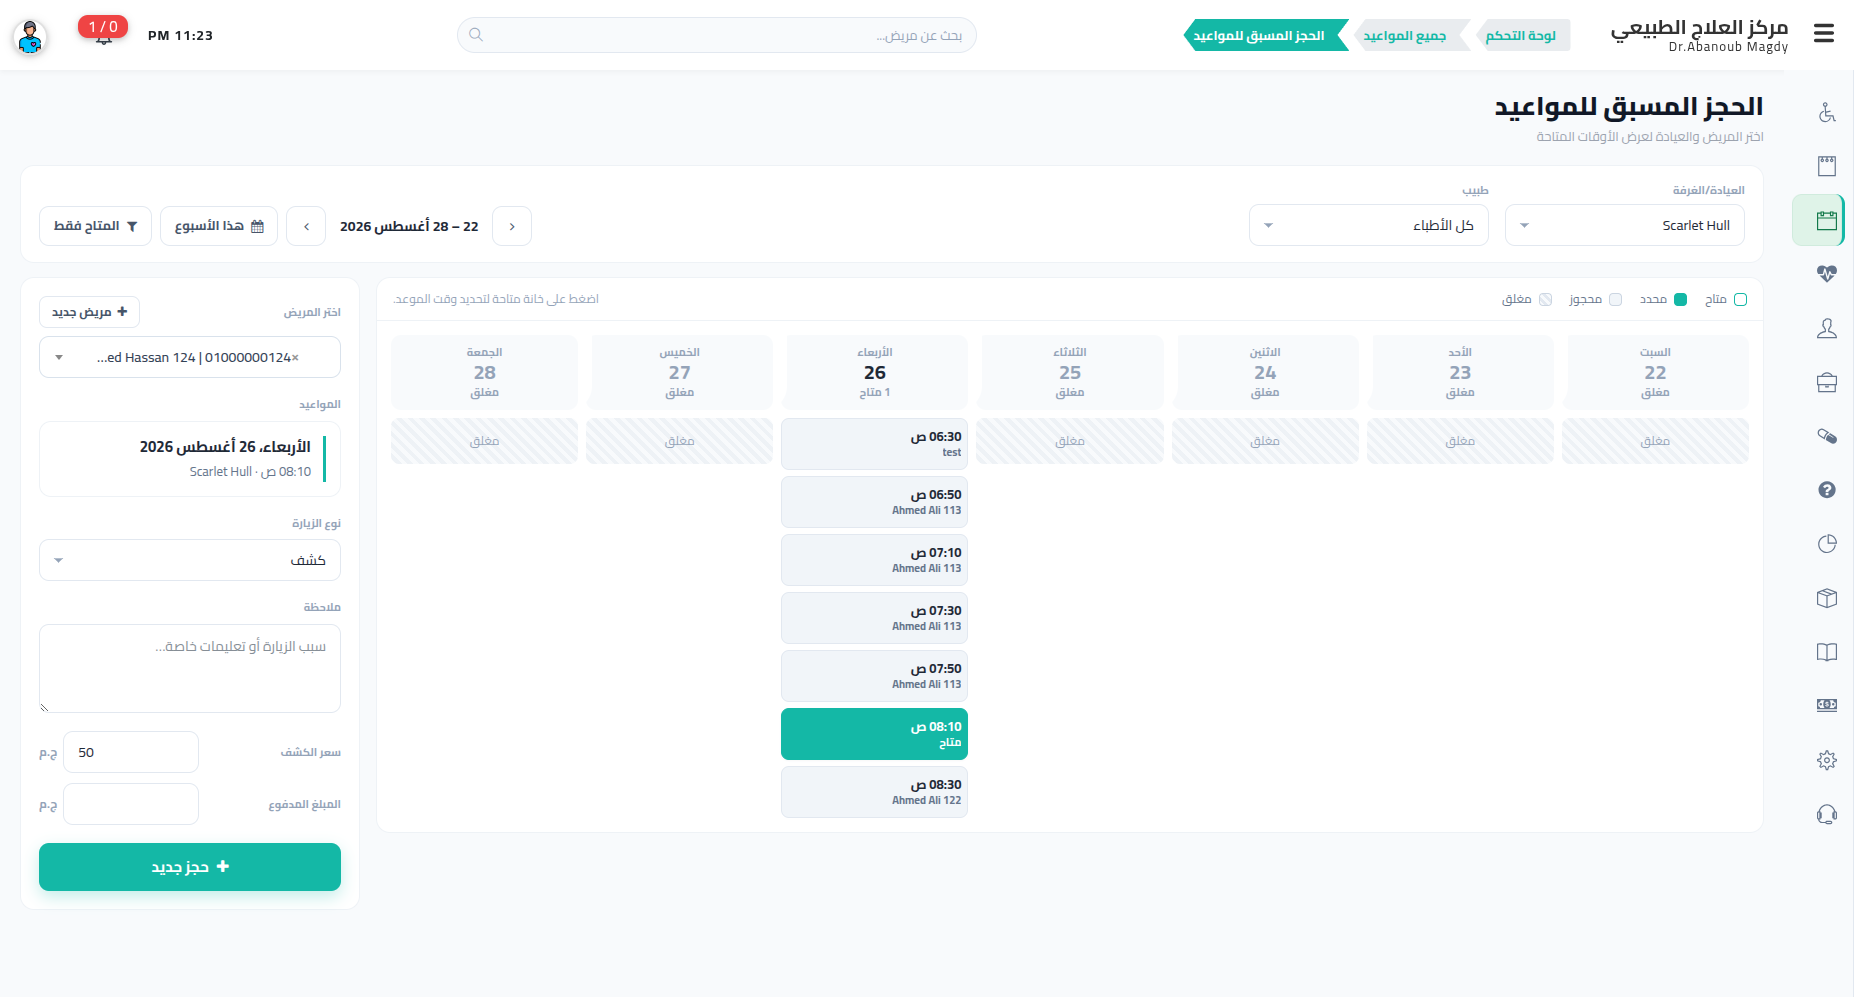
Set the top row first, because it decides which slots you see:
| Control | What it does |
|---|---|
| Clinic / Room | Which clinic's working hours the grid is drawn from |
| Doctor | One doctor, or All doctors. A doctor missing from the list is added with Add employee at the bottom of it, which opens the staff form in a new tab |
| ‹ › and the date range | Move week by week |
| This Week | Jumps back to the current week |
| Available only | Hides booked and closed slots |
Each day column shows how many slots are open, or Closed if the clinic does not work that day. The legend above the grid explains the colours:
| Colour | Meaning |
|---|---|
| Available | Free — click it to take it |
| Selected | The slot you just clicked |
| Booked | Taken; the cell shows the patient's name |
| Closed | Outside working hours |
WARNING
An empty grid, or every day marked Closed, means the clinic has no working hours defined yet. Set them under Setting → Clinic Timing Setting — nothing can be booked before that.
Step 2 — Choose the Patient
In the panel beside the grid, search for the patient by name, file number or phone under Select Patient.
Not in the system yet? Click + New Patient — the patient form opens in a modal and the new patient is selected automatically once you submit it. The fields are the same as How to Add a Patient.
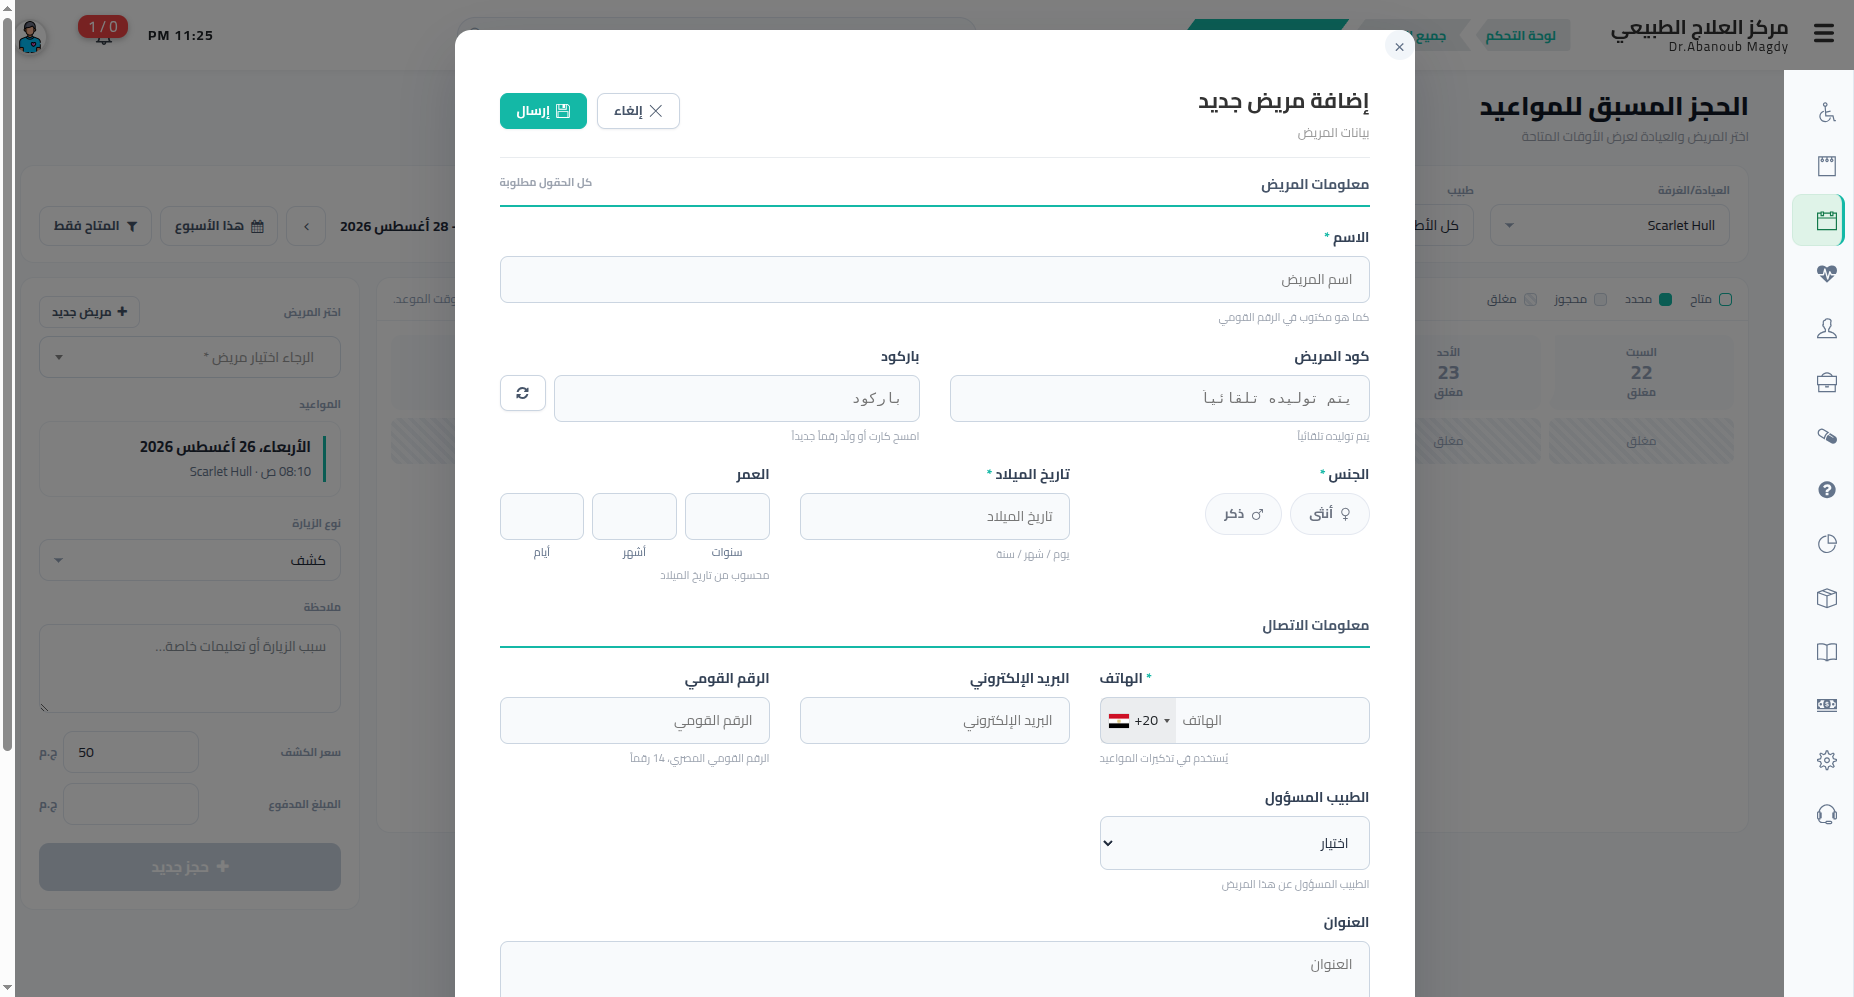
Step 3 — Pick the Time Slot
Click any Available cell in the grid. The chosen slot appears in the panel under Appointment with its date, clinic and time, so you can check it before saving.
Clicked the wrong one? Just click another cell — the panel follows your last click.
Step 4 — Fill In the Booking and Save
| Field | Notes |
|---|---|
| Visit Type | Examination, Consultation, Follow-up or Session |
| Note | Reason for the visit or special instructions |
| Visit Fee | Pre-filled from the default price for that visit type, set under Setting → Appointment Settings. Editable |
| Amount Paid | Add payment opens the same payment dialog used everywhere else: amount, payment method, date and note. Tap the fee shown there to pay it in full. Once filled in, the payment shows in place of the button with ✎ to change it and ✕ to take it back. Skip it if the patient pays later |
Click + New Booking to save. The appointment is created with status Accepted, and any payment added is recorded against it straight away, with its method, date and note.
TIP
If two people grab the same slot at the same moment, the second save is refused with a "slot taken" message — pick another cell and save again.
Without Internet
Booking works with no connection: pick the patient, the doctor and the time as usual. The visit appears on today's board marked Not sent until the clinic system has it.
Your device cannot see bookings made elsewhere while it is offline, so the visit is never dropped for clashing — it is booked, and if the slot filled up meanwhile, both visits show on the Unsent work screen for you to move one.
A payment taken at the moment of booking is recorded too. The receipt photo waits for the line.