How to Add a Patient
Every appointment, prescription, invoice and medical document in the system hangs off a patient record. This page covers creating one, what happens when the system thinks it is a duplicate, and what lives inside the patient file afterwards.
Where to Find It
Click an address to open that screen on your own clinic. The first click asks which clinic you are, then remembers it. Addresses holding a {id} or {token} need a specific record, so they are shown but not linked.
| Screen | Address |
|---|---|
| All Patients | /all-patient |
| New Patient | /new-patient |
| Patient file | /view-patient/{id} |
| Edit patient | /edit-patient/{id} |
| Medical documents | /patient-medical-file/{id} |
| Medical history | /patient-history/{id} |
| Patient Settings | /patient-settings |
| Patient custom fields | /custom-fields/patient |
| Import patients from CSV | /import/patients |
| The patient's own page (QR link) | /qr/patient/{token} |
Before You Start
Two settings shape the patient form. Both are under Setting → Patient Settings:
| Setting | Effect |
|---|---|
| Custom fields | Extra fields you define yourself (insurance number, referral source, anything) appear on the patient form |
| Specialty tabs | Growth Tracking, Dental, Physical Therapy, Nutrition and Body Measurements only show on the patient file when switched on |
If you are moving from another system, do not type patients in one by one — see Importing an existing patient list at the bottom.
Step 1 — Open the New Patient Form
From the sidebar, go to Patients → New Patient.
The form is split into three sections, listed in the panel on the side: Patient Information, Contact Information and Additional Information. Click a section name to jump to it. Under them, a Required Fields bar tracks your progress — 4 of 4 required fields complete means you can submit.
An Unsaved Changes badge sits next to the page title until you submit.
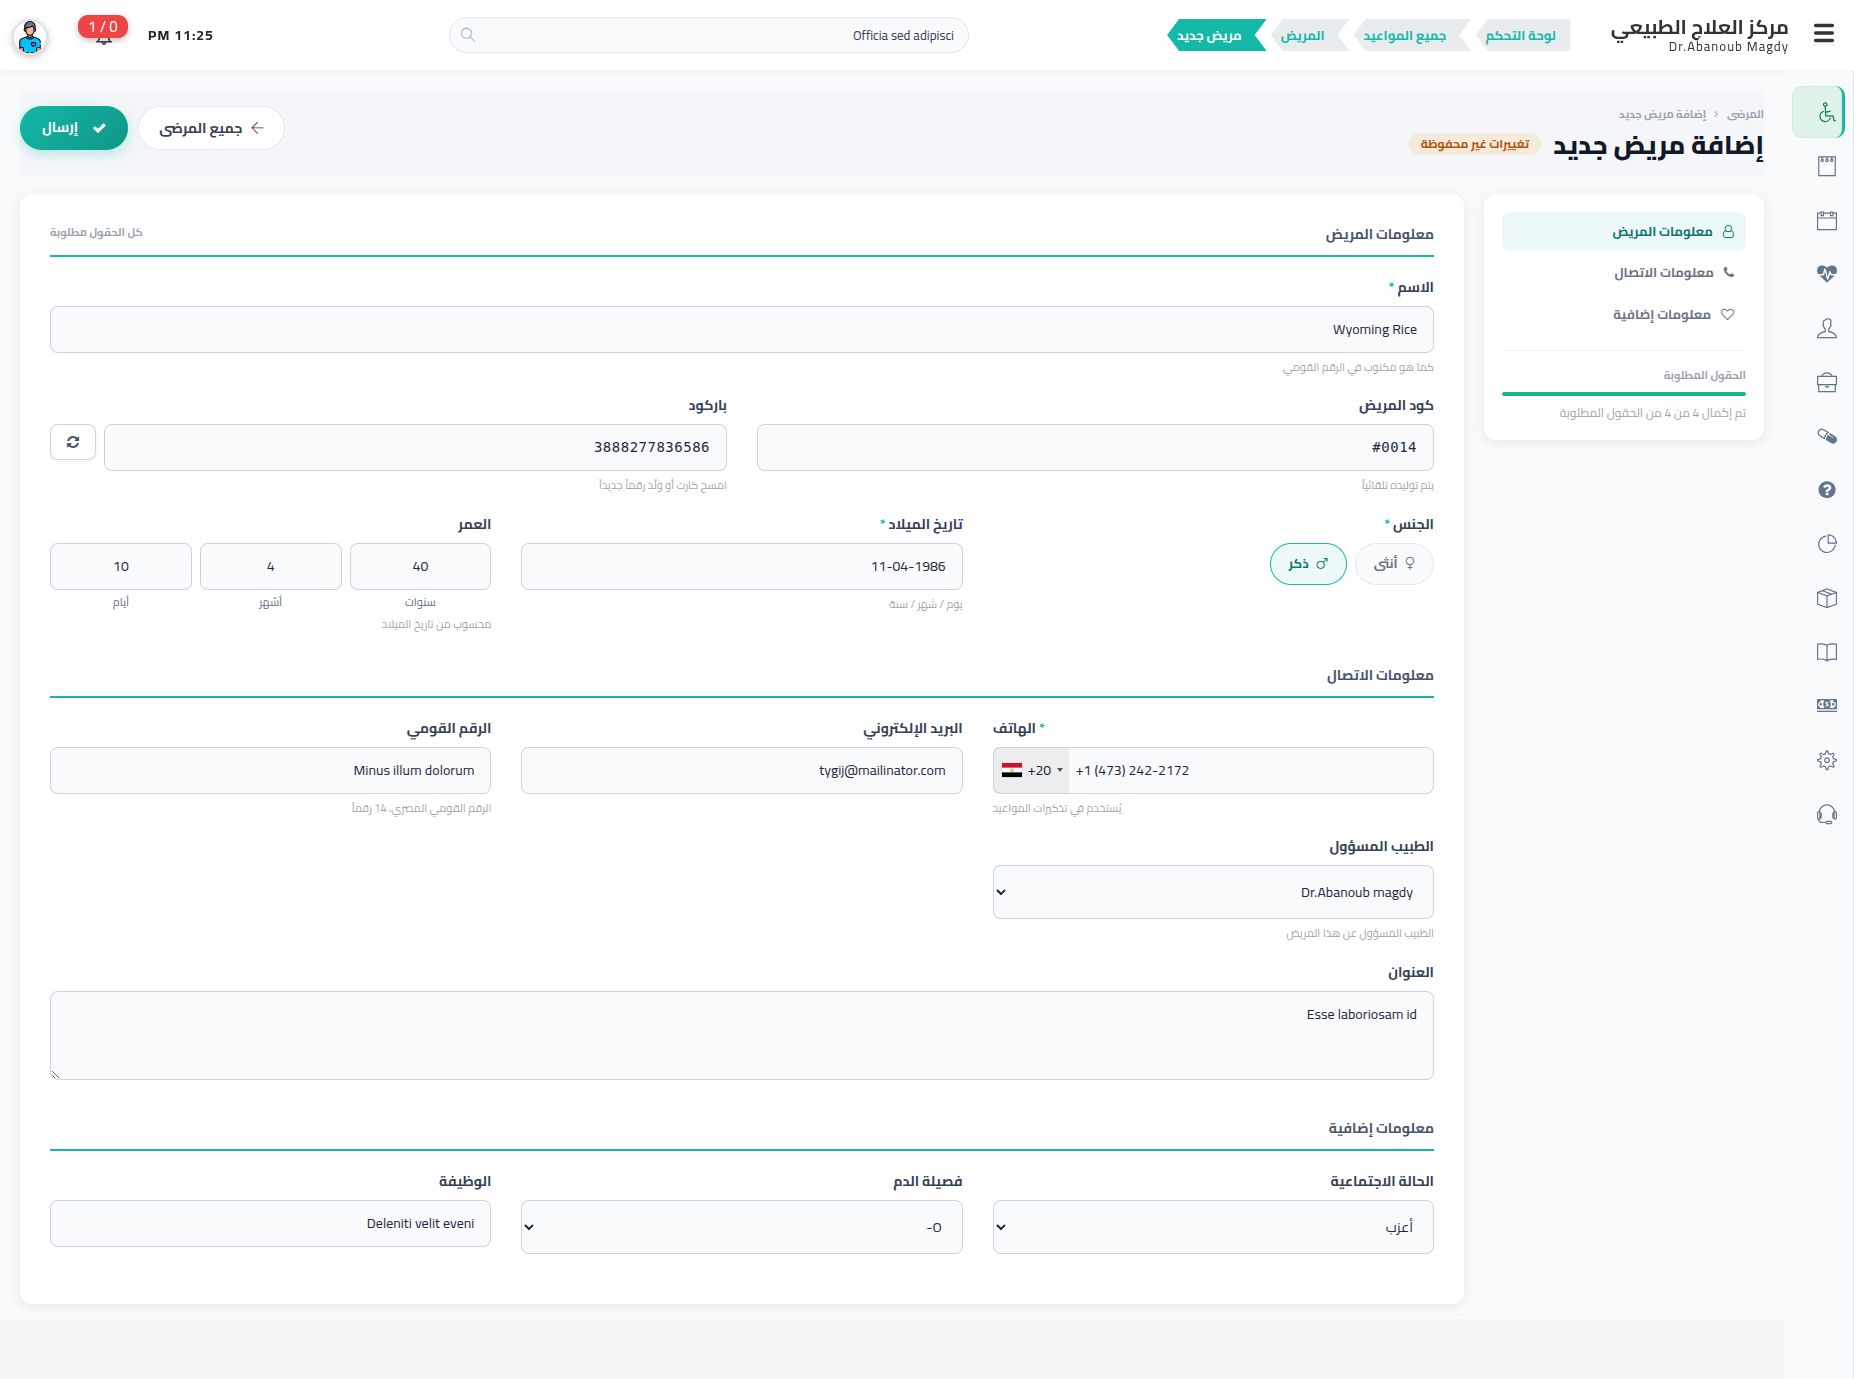
Step 2 — Patient Information
| Field | Notes |
|---|---|
| Name * | As written on the national ID |
| Patient Code | Generated automatically — leave it alone |
| Barcode | Scan an existing patient card, or press the refresh button to generate a new number |
| Gender * | Male / Female |
| Date of Birth * | Day / Month / Year |
| Age | Filled in for you from the date of birth, in years, months and days |
* required
Step 3 — Contact Information
| Field | Notes |
|---|---|
| Phone * | With country code (+20 by default). This is the number used for appointment reminders |
| Optional | |
| National ID | Egyptian national ID, 14 digits |
| Responsible Doctor | The doctor this patient belongs to. On some clinics this position shows City instead |
| Address | Free text |
Step 4 — Additional Information
Marital Status, Blood Group and Job — all optional, all dropdowns except Job.
How they heard of us — optional, and a list you own: Instagram, a referral, an advertisement, passing by. Edit the list to match what you actually run.
It is a list rather than a free-text box because Reports → Patients groups new patients by it, and free text does not group. A patient registered before you started asking reads not recorded, which is the honest answer — do not go back and guess.
Any custom fields your clinic defined appear in these sections too, and a photo field shows if patient photos are enabled.
Click Submit (top of the page) to create the record. All Patients next to it leaves without saving.
TIP
You can also create a patient without leaving the booking screen — the + New Patient button on the Advance Reservation page opens the same form in a modal and selects the new patient straight away. See How to Add an Appointment.
Step 5 — Handle the Duplicate Warning
If a patient with the same name or the same phone number already exists, the system does not block the save — it saves the record and shows a duplicate warning banner on the patient file, with the matching patient linked next to it.
Two ways out:
- It is the same person — open the existing record and work there; delete the one you just created.
- It is genuinely a different person (same name, family sharing a phone) — dismiss the warning on the patient file and it will not come back.
The Patient File
Opening a patient — from the list, from the header search, or from any appointment — lands on their file. Everything the clinic knows about that person is on this one page.
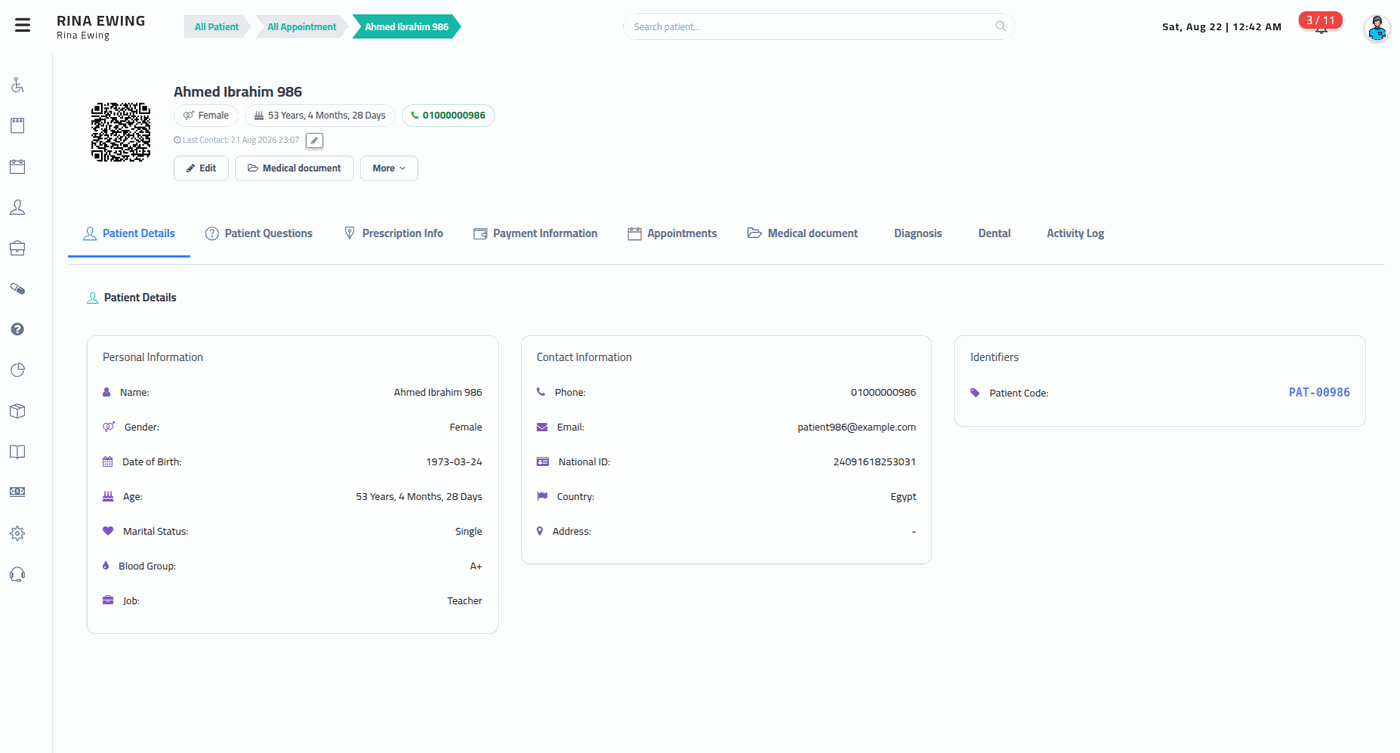
The header
Across the top: the patient's QR code, the name, then gender, age and phone. Under them sits Last contact with a small pencil — click it, pick a date, save, and the list's Last contact column follows. That is how you record "I called them today" without writing a note anywhere.
The action bar underneath changes with the situation:
| Action | When it appears |
|---|---|
| Mark as Done | Only while this patient has an appointment in session — closes the visit and returns you to the kanban board |
| Analyze with AI | When AI is switched on. A menu with four ways to read the file — see below |
| Edit | The same form you filled in when creating them |
| Medical Documents | Jumps to the upload screen |
| More | WhatsApp (opens a chat with their number) and Delete |
Analyze with AI
The button opens a menu, not the analysis itself. Nothing runs until you pick a row.
| Row | What happens | Who pays |
|---|---|---|
| Analyze on this site | The clinic's own AI provider reads the record and answers in a dialog. The answer is kept in the patient's analysis history, and the dialog also lists the earlier ones | Counts against your clinic's monthly AI allowance |
| Analyze with ChatGPT | Copies the same patient summary to your clipboard and opens ChatGPT in a new tab. Paste it in the chat box | Your own ChatGPT account. The clinic is charged nothing |
| Analyze with Claude | The same, opening Claude | Your own Claude account |
| Analyze with Gemini | The same, opening Gemini | Your own Gemini account |
Two things follow from that split:
- An answer from an outside assistant is not saved to the patient's analysis history. Only Analyze on this site is kept in the record.
- The summary is real patient data. Sending it to a chat account outside the clinic is your decision, so only staff with permission to view medical records see this menu at all. The summary carries the clinical picture — diagnoses, appointments, prescriptions, measurements — and leaves out contact details and share links.
Each outside row is an ordinary link — /patient/{id}/ai/chatgpt, /claude, /gemini — so it opens in a new tab the way any link does, and middle-click or Open in new tab work too. The clinic system builds the summary and forwards you to the assistant with it already in the chat box. On a very long record the chat opens empty instead: a summary past about 16 KB gets truncated somewhere on the way, and half a patient record is a worse prompt than none. That is why the summary is also copied to your clipboard on every click — if the box is empty, paste.
In the desktop application the assistant opens in your real browser, not inside the app window — the app has no address bar, so anything outside the clinic is handed to the browser where you can see where you are. The summary is copied before the hand-off, so it is on your clipboard when the browser comes up.
Every row here needs a connection. Offline, the menu still opens but no summary can be built — the clinic's own analysis and the outside assistants alike wait until you are back online.
The tabs
| Tab | What it holds | Hidden without |
|---|---|---|
| Patient Details | Personal information, contact information, identifiers (patient code and barcode, with a copy button), your custom fields, and notes | — |
| Patient Questions | Every intake answer with its date, plus Ask Question to answer one now | View Medical Records |
| Prescription Info | This patient's prescriptions, and Write New Prescription | View Prescriptions |
| Payment Info | Every payment with its source, method and receipt link, and Make Appointment | View Payments |
| Appointments | Past and upcoming bookings, newest first | any appointment permission |
| Medical Documents | Uploaded lab results, scans and letters | View Medical Records |
| Diagnosis | Diagnoses recorded over time | View Medical Records |
| Activity Log | Who changed what on this patient, and when | Edit Patients |
Specialty tabs — Growth Tracking, Dental, Physical Therapy, Nutrition, Body Measurements — sit among them when switched on in Patient Settings.
TIP
The tabs are the reason two people describing "the patient page" can disagree. A receptionist without View Medical Records genuinely has no Questions, Documents or Diagnosis tab — see Staff and Roles.
Recording a diagnosis
Diagnosis → Add Diagnosis. Only the date is required; the rest is as much detail as you want to keep.
| Field | Notes |
|---|---|
| Link to visit | Attach it to one appointment, or leave it unlinked |
| Diagnosis date * | |
| Body part and Side | Left, right, both |
| Diagnosis type | |
| Severity or grade | |
| Notes |
The table lists them with the visit they belong to and who recorded them, each row editable and deletable.
Uploading Medical Documents
Open the patient, go to the Medical Documents tab, and upload lab results, scans or referral letters. They stay attached to the patient and are visible from any later visit.
The Patient List
Patients → All Patients is the working list. Its header counts how many patients are registered and how many arrived this week, and Import and New Patient sit beside them.
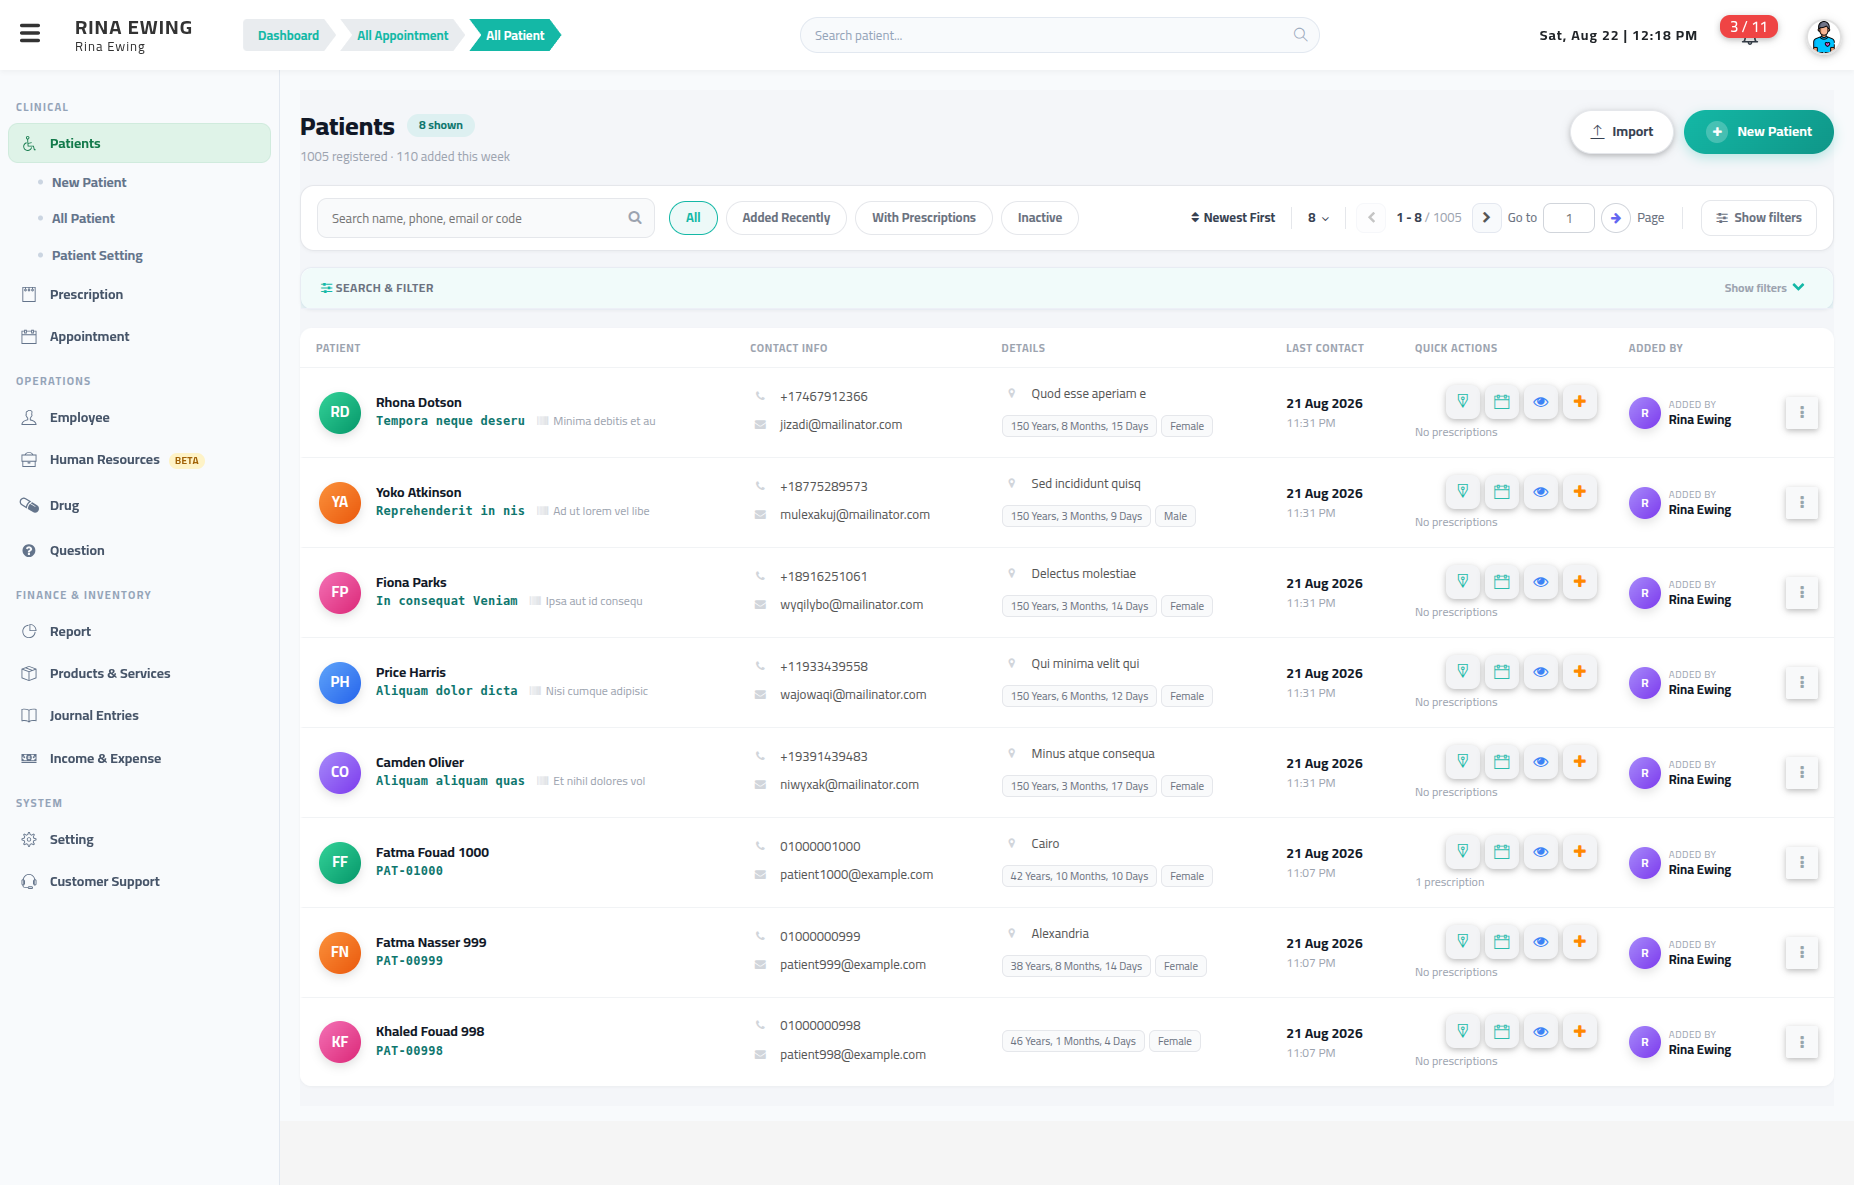
Narrowing it down
Four chips do the common jobs in one click: All, Added recently, With prescriptions, Inactive.
The search box matches name, phone, email or patient code. Under Search & Filter there is more:
| Filter | Notes |
|---|---|
| Patient | Pick one by name |
| Barcode | Scan a patient card, or type the code |
| Last contact | A date range — the basis of any follow-up list |
| Added by | A staff member, or Added by patient for self-registrations |
| Age group | |
| Assigned doctor |
A counter reports how many filters are applied, and Clear all resets them. Sorting covers newest and oldest first, last contact ascending or descending, and patient code A–Z or Z–A.
The columns
Patient (photo, name, code), Contact info, Details, Last contact, Quick actions, Added by — plus a column for any custom field you marked as a list column.
Each row carries the four quick actions — Prescribe, Book, View, Add medical file — and a menu with Edit, View and Delete.
TIP
From any page in the system, the search box in the top header finds a patient by name or phone as you type and opens their file directly. Faster than coming back here.
Recently opened patients
Every Patient box in a form or a filter — booking, prescription, invoice, treatment course, session and the rest — lists five patients as soon as you click into it, before you type anything: the ones whose files you opened most recently, then the rest alphabetically. Typing still searches the whole list, and among the matches the recently opened come first. Each user has their own list: the receptionist's and the doctor's are not the same. While the internet is down the box waits for you to type.
Sharing With the Patient
Each patient has a shareable link and QR code. Send it over WhatsApp and the patient can, without signing in:
- see their upcoming appointment,
- cancel it,
- answer the intake questions before they arrive.
The language of what they see follows the share language in Setting → Site Settings, which is set separately from your own interface language.
Importing an Existing Patient List
For a list of patients from another system, use Import instead of the form:
- Go to the import page for patients.
- Download the sample CSV and match your columns to it.
- Upload the file — the system validates it before importing anything.
- The import runs in the background with a progress bar, and can be paused, resumed or cancelled.
WARNING
Imports run on a background queue. If nothing progresses past 0%, the queue worker is not running — ask whoever administers your server.
Without Internet
If the line is down you can still register the patient in front of you. The record is kept on this computer, marked Not sent, and reaches the clinic system by itself when the connection returns.
Two things wait: the photo, which cannot be attached until you are back online, and the file number, which the clinic system issues when the record arrives. Everything else is saved now.